How to Whipstitch a Seam in Crochet
September 17, 2022
Why the Whipstitch?
There are many different methods for joining or seaming crochet pieces. Today, we’re going to focus on the whipstitch because of its popularity, ease, and versatility. It’s mainly used for sewing straight-edged crochet pieces together.
Although the whipstitch is not an invisible stitch, it won’t stand out in an obvious way and is less bulky than some other seaming methods. And, if you choose a contrasting color, the whipstitch can create a lovely and simple border or decoration for your projects.
Some Tools You’ll Need
For the purpose of this demonstration and for practice, you’ll need a crochet hook, scissors, two crocheted pieces (small crochet swatches or squares will work fine), an embroidery needle, and yarn that either matches or contrasts with your pieces.
During the practice stage, it’s probably best to use a contrasting colored yarn, so you can easily see your whipstitch as you work.
Whipstitch Instructions
I’m basing these instructions on two small, single-crocheted pieces. Before starting your whipstitching, lay your two crocheted pieces on top of one another, right sides together (if your crocheted pieces are done in rows, there won’t really be a right or wrong side), making sure that each edge is matched up properly….top to top, bottom to bottom, and side to side.
Once you have your pieces together, double-check your stitch alignment, then pin them in place loosely (not necessary for smaller crochet pieces, as they can be held in your hands).
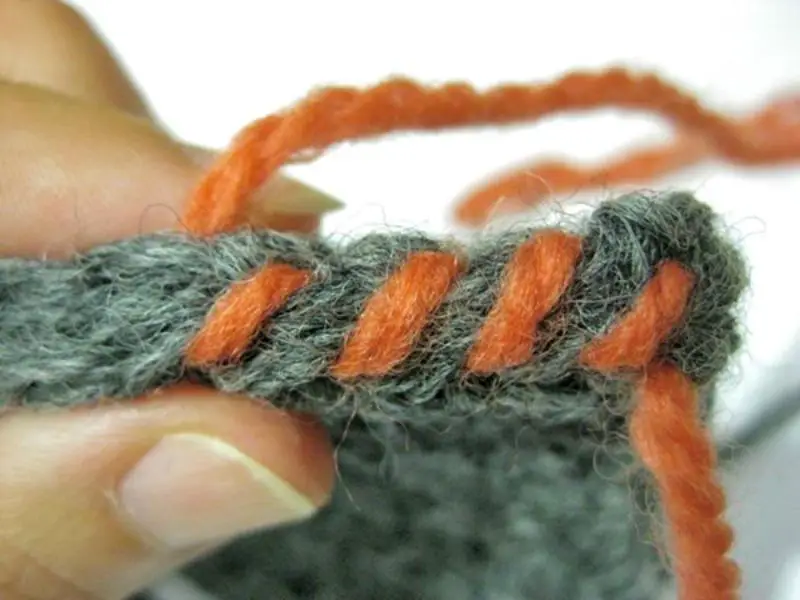
We’re going to start on the easiest edge, which is the top or bottom edge, because of the clean, easy-to-see stitches. The sides are slightly uneven, so they require a little more attention. Thread your embroidery needle, and let’s whipstitch!
HINT: Doing a whipstitch is the same concept as an old, spiral phone cord. It wraps around in the same direction. You are just “wrapping” stitches in yarn!
For top and bottom edges
- Line up your stitches.
- Start at the corner and insert your needle, either front to back or back to front, but whichever you choose, you need to stick with it throughout the whipstitching process. Slip your needle under the “v” (two loops of the stitch), on the piece closest to you AND through the “v” on the piece farthest from you. You will have passed the needle under two “v’s” (four loops).
- Now, repeat Step 1 until you’ve done the final stitch on that edge. If you’d like, you can continue around the corner or around the whole square!
- Cut yarn and weave in ends. Wasn’t that easy?
For left and right side edges
- Line up your rows.
- Start at the corner and insert your needle, either front to back or back to front, but whichever you choose, you need to stick with it throughout the whipstitching process. The side will be uneven, but you will notice small “dips” and “valleys” – those are your rows, and where you will be placing your stitches. Just try to keep your whipstitching even and consistent and it should come out fine. Whipstitching is very forgiving and it’s easy to pull out if you need to fix something.
- Now, repeat Step 1 until you’ve done the final stitch on that edge. If you’d like, you can continue around the corner or around the whole square!
- Cut yarn and weave in ends. Good job – not too shabby!
Whipstitching Options
There are really two ways to do this stitch. One is the method that I described to you above, but it can also be done another way. Instead of taking it through the full “v” (or stitch) in each piece, you can take it through just the “inner loops”.
And, what I mean by that is that for Step 1, the instructions would then change to, “…Slip your needle under the back loop (farthest loop of the “v”) on the piece closest to you AND through the front loop (closest loop of the “v”) of the piece farthest from you. You will have passed the needle under two loops.” Then, carry on normally.
What’s the Difference?
If you do the original whipstitch, your finished piece will lay nicer and the seam itself will be less noticeable. If you do the modified version (back and front loops), your seam will be slightly raised on one side and very flat on the other.
This is not necessarily a bad thing, as this version can be a benefit if you’re using the whipstitch as a decorative addition.
Also, keep in mind that when using the whipstitch decoratively in a contrasting colored yarn, you will need somewhere to weave in those ends, so one piece or the other should contain that color nearby to “hide” unsightly ends.
If you prefer a whipstitch video tutorial…
Warmly, Rachel